Using DIY shelves to optimize small spaces is a fantastic way to maximize your room's potential while adding personal style. You'll fit shelves into those tricky corners, making the most of vertical space. With a little creativity, you can design shelves that perfectly match your decor and showcase your favorite items. Plus, it's cost-effective—why buy when you can create? Accurate measurements and strong materials guarantee your shelves are both functional and safe. Ready to get started? Embrace the charm of DIY and discover how your space can transform into something truly special as you explore more ideas ahead!
Design Highlights
- DIY shelves maximize vertical space, making small areas more organized and functional by utilizing otherwise wasted wall space.
- Customizable designs allow homeowners to tailor shelf dimensions and aesthetics to fit unique spaces and personal styles.
- Building shelves is cost-effective, providing significant savings compared to purchasing pre-made shelving units.
- Creative shelf designs enable expression through styling, making it easy to incorporate seasonal decor or personal flair.
- DIY shelving increases storage capacity, helping to declutter and organize various items efficiently within limited spaces.
Benefits of DIY Shelves
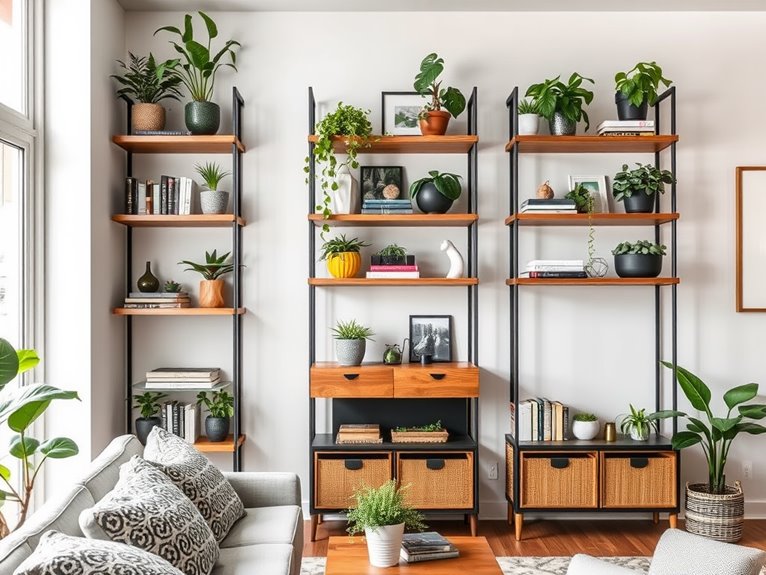
When you opt for DIY shelves, you open up a world of customization and creativity tailored to your space. Imagine crafting shelves that perfectly fit your unique style and needs! You get to choose the height, width, and even the colors. This personalization means your shelves won't just be functional; they'll also be a reflection of you. Additionally, you can enhance your DIY shelves with seasonal decor, such as winter shelf decor, to create a cozy atmosphere in your library. Incorporating seasonal themes and colors into your design can further enhance the cozy vibe of your space. Using natural materials like wood for your DIY shelves can also add warmth and a rustic touch to your decor. Consider using durable materials to ensure that your shelves maintain their integrity over time.
Another fantastic benefit is the cost savings. Why spend a fortune on pre-made shelves when you can create your own for a fraction of the price? Plus, you can repurpose materials you already have, turning old wood or unused furniture into something beautiful and useful. The feeling of accomplishment you'll get from building your own shelves is unbeatable!
DIY shelves also allow you to maximize every inch of your small space. You can design them to fit awkward corners or underutilized areas, making your home feel more organized and welcoming. Moreover, incorporating seasonal motifs into your DIY shelves can add a festive touch that enhances the overall atmosphere of your workspace.
Think about how satisfying it'll be to have a dedicated spot for your books, plants, or knick-knacks. Ready to release your creativity? Immerse yourself in the exciting world of DIY shelves, and watch your space transform!
Choosing the Right Materials

Selecting the right materials is key to creating sturdy and stylish DIY shelves. You want your shelves to not only look great but also hold up under the weight of your favorite books or decorative pieces.
Start with the basics: wood, metal, or even sturdy plastic. Each material has its charm and purpose. For a warm, rustic look, go for reclaimed wood; it adds character and is often eco-friendly. Metal shelves can bring a modern, industrial vibe, perfect for those sleek, minimalist spaces. Durable materials like solid wood or metal help ensure your shelves can withstand everyday use, similar to how rustic wooden decor elements in decor can enhance the overall aesthetic.
Don't forget about brackets! They're essential for support. Choose strong, durable options that match your aesthetic. You might even consider floating shelves, which create an illusion of more space. Plus, they're visually appealing.
Also, think about the finish. A good sealant or paint can protect your shelves and tie them in with your room's design. Additionally, selecting materials that are durable and easy to clean ensures your shelves maintain their charm in utility areas.
So, what's your style? Are you leaning towards rustic charm or modern simplicity? By picking the right materials, you'll not only enhance your space but also enjoy the process of making something uniquely yours. Investing in high-quality materials is essential for long-lasting decor that withstands seasonal use.
Jump in, have fun, and let your creativity shine!
Measuring Your Wall Space
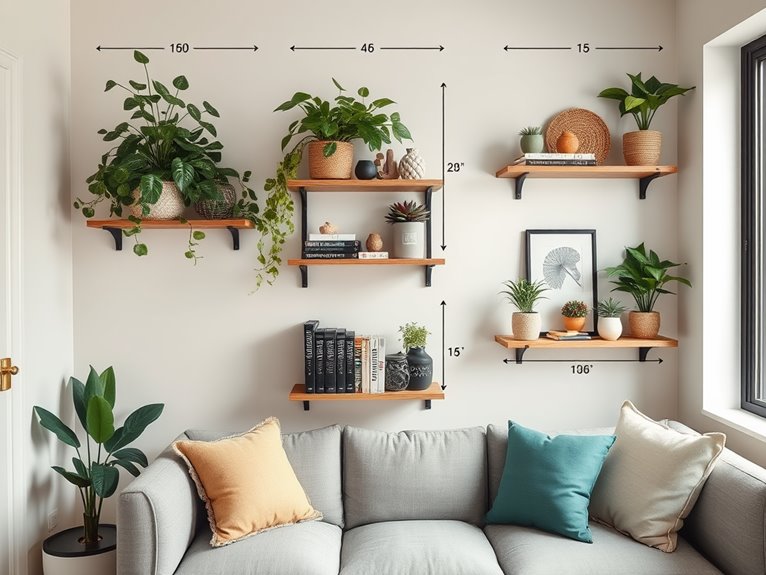
Your wall space is vital for determining the size and placement of your DIY shelves. Start by measuring the area where you want your shelves. Use a tape measure to get accurate dimensions. Don't forget to note the height, width, and depth of the space. This simple step can transform your design process. Adding pastel-colored decorative elements can further enhance the spring vibe of your shelves. Additionally, incorporating stylish decor can create an inviting atmosphere in your exercise room.
Consider any obstacles, like windows, doors, or light switches. You want your shelves to be functional and visually appealing, so placement matters. Think about how high you want the shelves to go. Are you aiming for easy access, or do you want to create an artistic display? Incorporating color scheme harmony will help ensure that your shelves blend well with the overall decor. Additionally, selecting lightweight decor items can facilitate easy rearrangement and enhance your shelving aesthetics.
Once you have your measurements, think about what you'll store on those shelves. Are you looking to display books, plants, or decorative items? Knowing this will help you decide how deep your shelves need to be.
Finally, consider the wall's weight capacity. Some walls can hold more than others, and you'll want to make sure your shelves are secure. Additionally, incorporating seasonal decor elements can enhance the overall aesthetic of your shelves while keeping them functional.
Measuring your wall space might seem tedious, but it's essential for creating a stunning, practical addition to your small space. Ready to get started? Your dream shelves are just a measurement away!
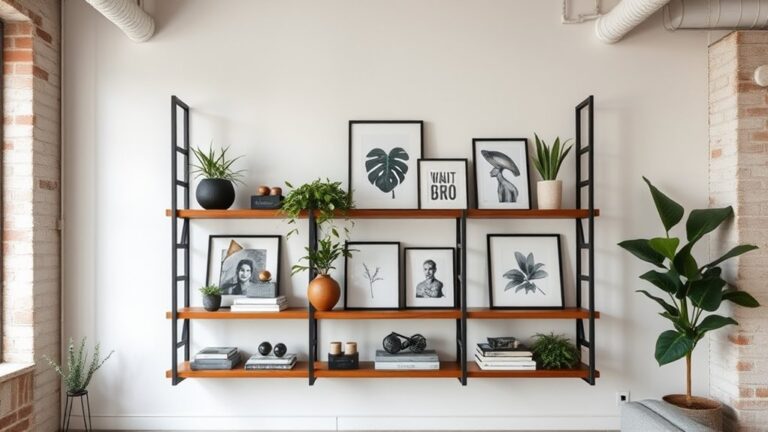
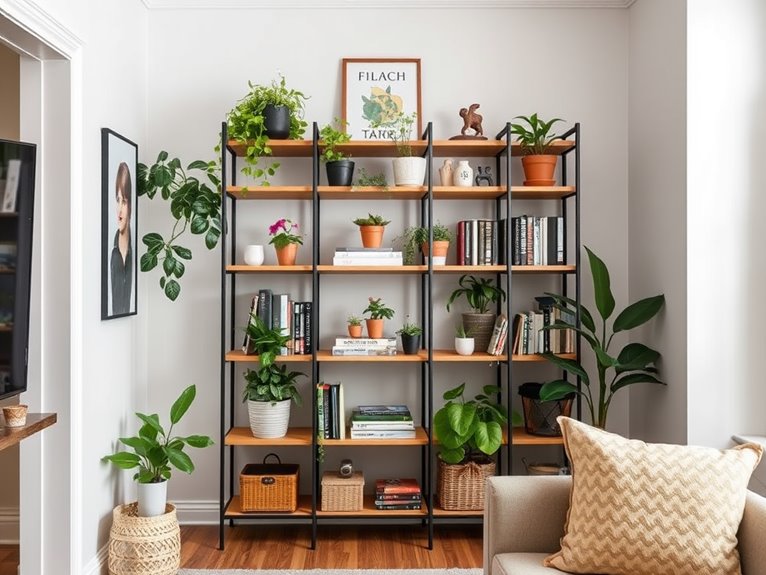
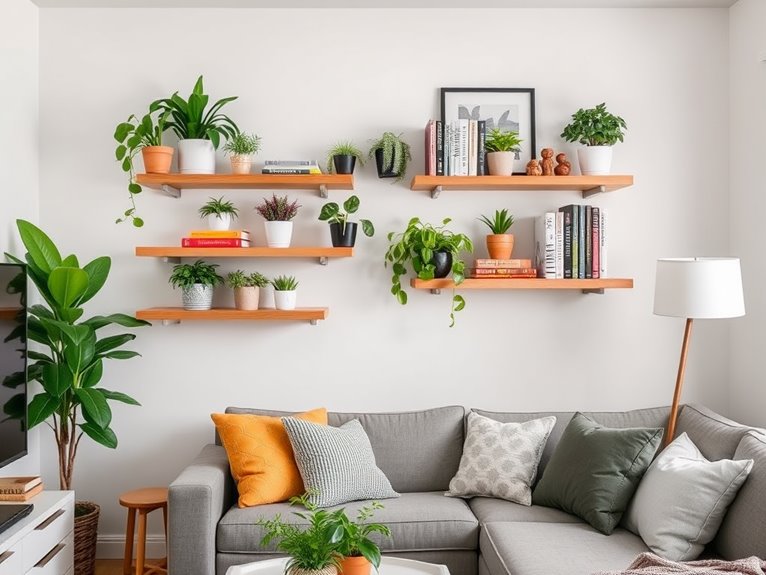
Creative Shelf Designs
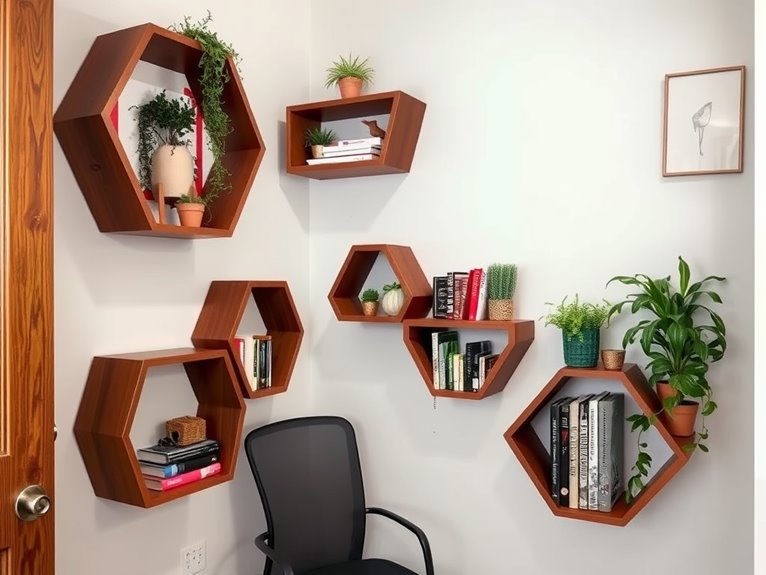
Now that you've measured your wall space, it's time to get creative with your shelf designs. Think outside the box! Why not try floating shelves? They create a sleek look while giving you plenty of room to display your favorite books or plants. Incorporating summer shelf decor ideas can also help you bring seasonal flair into your workspace. Durable materials are essential for ensuring that your decor withstands changing seasons and outdoor elements. Consider using wood as a strong option for added durability and longevity, especially when considering winter shelf decor ideas to keep your outdoor space inviting.
You can also opt for corner shelves, turning an often-neglected space into a stylish feature.
Have you considered using crates or repurposed wood? They add a rustic charm and are super easy to customize. Stack them vertically for a fun, eclectic vibe or arrange them horizontally for a more classic feel.
You could even paint them in bold colors that match your personality!
Another idea is to mix and match shelf shapes. Use round shelves for a playful touch, or go for geometric designs that catch the eye.
You can also hang shelves at varying heights, creating a dynamic look that draws attention and maximizes storage. Incorporating stylish decor ideas can further enhance the aesthetic of your walk-in closet.
Whatever you choose, remember to make it personal. Add photos, trinkets, or art pieces that tell your story.
Your shelves should reflect who you are, so let your creativity shine! Are you ready to transform your space?
Installation Tips and Tricks
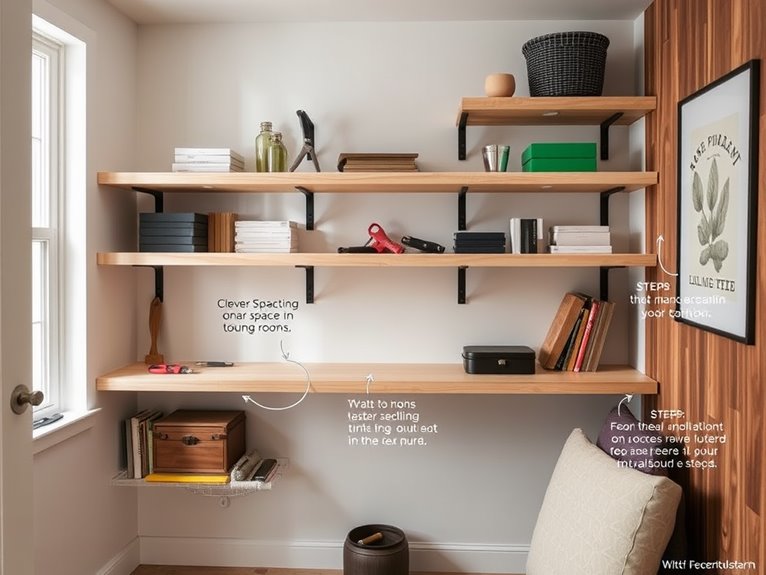
Installing shelves can be straightforward with the right approach. First, gather your materials: brackets, screws, a drill, and a level. You don't want to start this project without the right tools!
Measure your space carefully, and mark where you'll place your shelves. Remember, a well-measured plan can save you time and frustration later. Consider using weather-resistant materials to ensure longevity, especially if your shelves are in an area exposed to the elements. Adding winter shelf decor can also transform your shelves into a cozy display. Incorporating floral patterns and greenery can rejuvenate the shelves, evoking a cheerful atmosphere. You might also want to explore seasonal decor trends to keep your design fresh and inviting.
Next, make sure you anchor your brackets into the wall studs. This step's essential for stability. If you're unsure where the studs are, use a stud finder—it'll make your life easier!
Once you've secured your brackets, it's time to place your shelves. Don't hesitate to ask a friend for a hand; teamwork makes lifting and positioning much simpler. Consider adding decorative elements, such as holiday dining room shelf decor, to enhance the overall look of your new shelves.
Finally, step back and admire your work. How do the shelves look? Are they at the right height? Adjust if necessary, and soon, you'll have a beautiful, functional space ready to hold your favorite items.
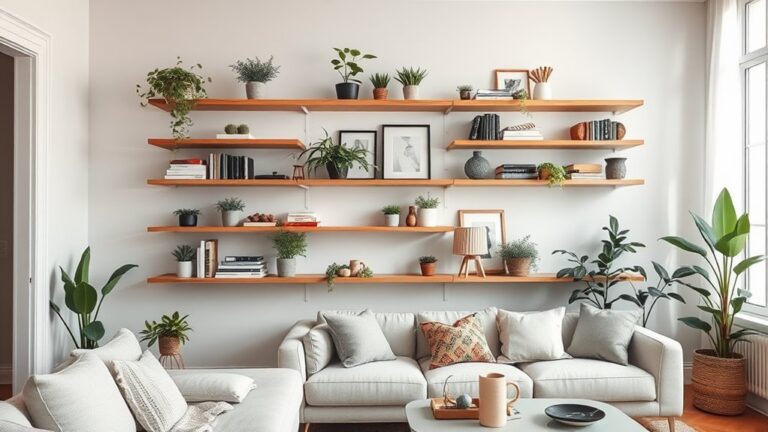
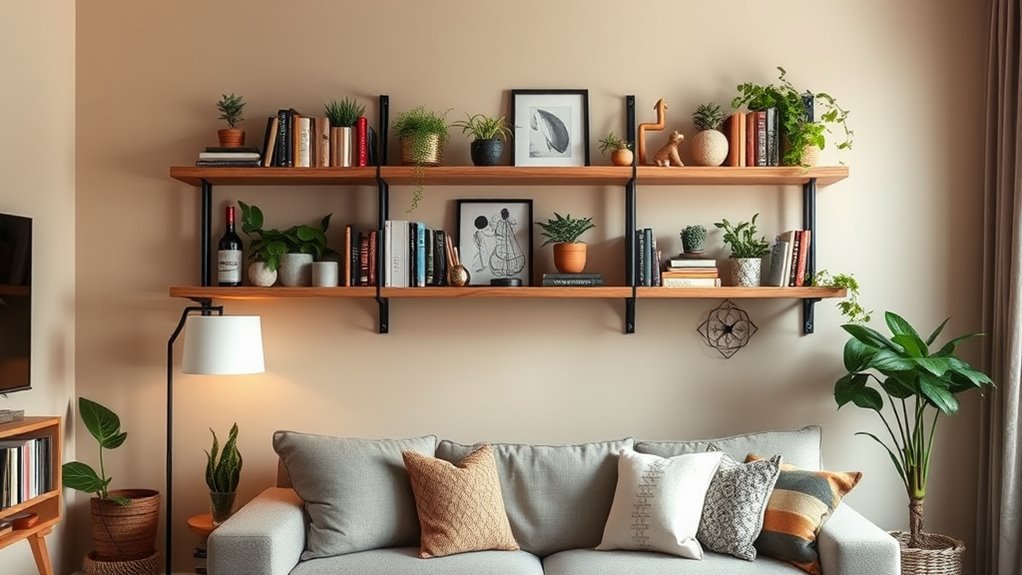
Organizing With Style
Once your shelves are up, it's time to think about how to arrange your items in a way that not only maximizes space but also showcases your style.
Start by grouping similar items together. This creates a cohesive look and makes your shelves more visually appealing. Think about color coordination, too. Sometimes, a pop of color can bring your shelves to life!
Don't be afraid to mix textures and shapes. Stack books vertically and horizontally, and place decorative boxes next to your favorite plants. This adds interest and keeps it from looking too cluttered.
Remember, it's all about balance. You want your shelves to be both functional and beautiful.
Consider the height of your shelves as well. Place larger items at the bottom for stability, and save your smaller, quirky pieces for the top. This not only draws the eye upward but also gives your space a more dynamic feel.
Lastly, leave some empty space. It might sound counterintuitive, but a little breathing room can make your shelves look intentional and stylish. Additionally, incorporating soft pastels in your decor will enhance the freshness of your arrangement while creating a cheerful atmosphere.
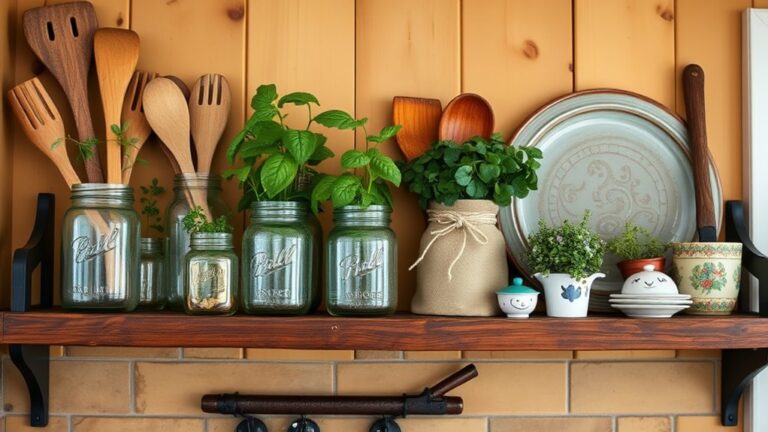
Incorporating Decor Elements
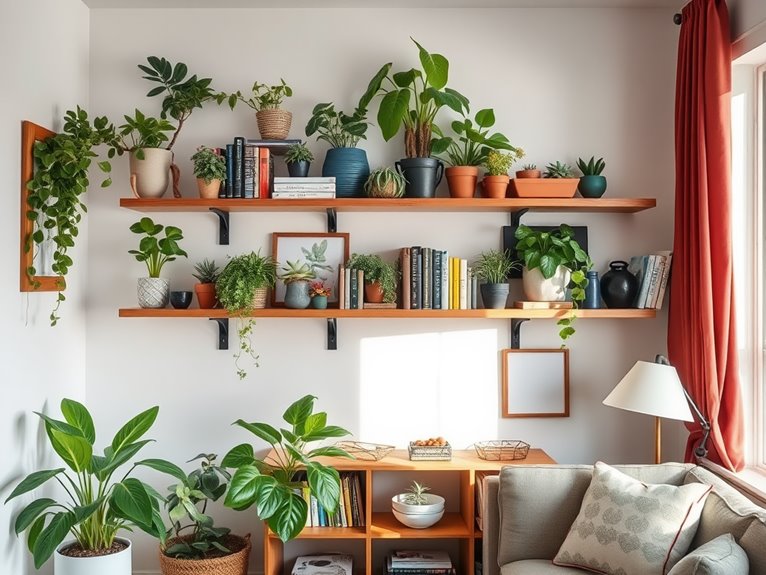
Creating an inviting atmosphere often hinges on the thoughtful incorporation of decor elements into your shelves. You can transform a simple shelf into a stunning focal point by mixing various decorative items. Think about adding colorful books, unique trinkets, or framed photos that reflect your personality. It's all about creating a space that tells your story!
Start by layering items of different heights. A tall plant can draw the eye upward, while shorter items create balance. Don't forget the power of texture—mixing wood, metal, and fabric can add depth to your arrangement. Ever thought about using baskets? They're perfect for hiding clutter while still looking stylish.
Consider the color scheme as well. Choose a cohesive palette that complements your room's vibe. A splash of color here and there can bring your shelves to life.
And hey, why not swap out items seasonally? That way, your shelves can evolve with the changing seasons or holidays.
Maintenance and Upkeep
Keeping your DIY shelves in top shape is essential for maintaining their charm and functionality. Regular maintenance not only enhances their appearance but also guarantees they serve you well for years.
So, what can you do to keep them looking fabulous?
Start by dusting your shelves weekly. A soft cloth or a feather duster works wonders. You wouldn't want dust to cloud the beauty of your carefully curated items, right?
Next, check for any signs of wear or damage. If you notice any scratches or chips, touch them up with paint or wood filler. A little TLC goes a long way!
Also, consider the weight you're placing on each shelf. Overloading can lead to sagging or even breakage. It's all about balance!
Finally, if your shelves are made of wood, don't forget to treat them with a protective finish periodically. This keeps moisture and stains at bay.
Frequently Asked Questions
Can I Use Recycled Materials for DIY Shelves?
Absolutely, you can use recycled materials for DIY shelves! Think about old wooden pallets, crates, or even repurposed doors.
Not only does this save money, but it also gives your shelves a unique charm. You'll feel great knowing you're helping the environment too.
Plus, crafting with recycled materials can spark creativity and add a personal touch to your space. So, gather those materials and let your imagination run wild!
How Do I Determine Shelf Weight Capacity?
To determine your shelf's weight capacity, start by checking the materials you're using. Solid wood is usually sturdier than particle board.
Next, consider the shelf's size and how it's supported; brackets and wall anchors play a big role.
Don't forget to factor in how evenly you'll distribute the weight. If you're unsure, a good rule of thumb is to test it out with lighter items first.
It's all about balance and safety!
What Tools Do I Need for Making Shelves?
To make your own shelves, you'll need a few essential tools.
Grab a power drill for easy installation, a saw to cut your wood to size, and a measuring tape for accuracy.
Don't forget a level to guarantee everything's straight!
You'll also want screws, brackets, and maybe some sandpaper for a smooth finish.
With these tools in hand, you're ready to transform your space.
Isn't it exciting to create something unique?
Are There Safety Concerns With DIY Shelves?
When you're crafting your own shelves, safety shouldn't be an afterthought, right?
Make certain you're using sturdy materials and proper tools; nothing ruins a cozy nook like a collapsing shelf!
Always secure your shelves to the wall, especially if they'll hold heavy items.
Check that the weight limit is appropriate for what you plan to store.
Taking these precautions guarantees your hard work stands strong, giving you peace of mind and a stylish space!
How Do I Fix Damaged Shelves?
If you've got damaged shelves, don't worry! You can easily fix them.
Start by evaluating the damage; is it a crack, a loose board, or something else? For cracks, use wood glue and clamps to hold it together.
If a board's loose, tighten screws or replace them.
Sand any rough spots and apply a fresh coat of paint or stain for a fresh look.
Isn't it rewarding to see your shelves good as new?
Conclusion
In summary, DIY shelves can truly transform your small space into something special. With a little creativity and effort, you can make every inch count. Why settle for ordinary when you can create something extraordinary? Remember, the world's your oyster when it comes to design! So grab those materials, release your imagination, and let's get to work. You'll not only save space but also add a personal touch that makes your home feel uniquely yours.